Showing posts with label Gardening. Show all posts

Monday, August 2, 2010

Peat Pots: My Experiment

You know the pots I am talking about — those little brown, paper-like pots that boast their eco-friendly benefits. In spring they are readily available at your local home improvement store next to all the seed displays. I was in love with idea of using them and bought a couple packages to try them out. What could be easier than starting seeds in a pot that can be placed directly into the ground?


The photo above shows 3 watermelon plants I started from seed a few weeks ago. As you can see, there is a big difference in the size of their leaves. I tried this little experiment because I noticed that some of the seedlings I have started were growing too slowly. I have great soil and have been carefully watering, the only other problem could be the peat pots.

Top Left: Seed was started in peat pot. The whole peat pot was planted.
Middle Right: Seed started in peat pot. The peat pot was planted but I tore out the bottom to expose the roots before planting.
Bottom Left: Seed was directly planted into soil with no peat pot.

The results are obvious to me. The biggest disappointment is the top plant. It is definitely the runt of the litter. The middle plant already has two flowers, but its leaves are compact and small. The bottom seed that was directly sown has large, full leaves and the sturdiest limbs of the three plants.

At first, I really liked the idea of using a biodegradable container for seed starting, but as I plant more seeds I see that transplanting or sowing them directly into the ground are better options. Plastic seed starting trays are not as environmentally friendly, but they will last forever, I can re-use them every season, and I only have to buy them one time.

Wednesday, July 14, 2010

Look Kids! Corn, Beans and Squash!


My husband and I took the kids on a trip to the east coast earlier this summer for a family reunion in Virginia Beach. The highlight for me? Not the sand & surf...but a quick visit to Historical Jamestown where I saw a real life example of a Native American planting method I have read about called the Three Sisters. My husband and kids were "oooh-ing" and "ahhh-ing" the old ships at the dock, and all I could do was scramble to take photos of corn, beans and squash!

Ha! I'm really turning into a garden nerd.


Here is how I understand the Three Sisters Method works...
  • Work soil into flat-topped mounds about 12 inches high by 24 inches wide and 3 feet apart.
  • Plant 4-6 corn kernels about 4-6 inches apart in a circle on top of the mound.
  • When Corn plants are 5-10 inches tall, plant 5-8 pole beans in a circle about 5 inches away from the circle of corn plants.
  • 1-2 weeks after planting the pole beans, plant 5-8 squash, gourd, or melon seeds around the outside edge of the mound about 12 inches from the bean plants.
  • After all the seeds have sprouted, it is probably a good idea to thin half the seedlings of each kind of plant to avoid crowding.
Its a brilliant system. The corn provides a stalk for the pole beans to climb, and the squash shades the ground which minimizes water evaporation and heat gain, as well as, helping prevent weed growth. The photo above seems to use a smaller mound, so I guess there is room for experimentation. I will be attempting this next summer in the raised garden.

Renee's Garden - Native American Three Sisters Garden

Thursday, July 1, 2010

He's a Pepper, She's a Pepper, I'm a Pepper Too! A Garden Update.

So, I thought I would post an update on the garden. I have to admit that the heat has kept me from playing in the dirt too much lately. Today it is 105 degrees! Ugh.


The zucchini harvest was very disappointing. I planted them too close together and the very few fruit they produced were ruined by the overlapping spiny leaves rubbing in the wind. I didn't get to eat a single zucchini out of the garden. I guess I have learned my lesson. I yanked those over sized, water sucking zucchini plants out of the garden today and planted some heat friendly pepper plants.

I planted 3 Jalapeno, 2 Sweet Red Bell Pepper, and 1 Anaheim Chili. My husband has been making homemade salsa lately and I thought this would be a nice way to contribute to the recipe. I have visions of cheese crisps with strips of roasted chilis, chips and salsa with home grown jalapenos, rice stuffed bell peppers with melted cheese. Mmmmmm.

As you can see from the jungle photo above, the tomatoes are absolutely WILD. I have no idea where one plant starts and the others begin. I guess there is something to be said for pruning. Hahaha! But it seems as though this hasn't hindered the harvest.

We have a constant supply of small cherry-like Juliet Tomatoes, Roma and San Marzano. My favorite is the large Champion variety which tastes like it is already salted, but it is also the squirrel's favorite, so I haven't had a chance to eat many of them. I have placed shiny pin wheels in the garden to deter animals. My grandmother suggested it. We will see if it works.

I have 5 strawberry plants out there. We haven't eaten a single strawberry yet because they mysteriously disappear.

The Basil is lovely. Our plant has grown into a great little bush with tender leaves.

And finally, our cucumber that we planted (stupidly) under the tomatoes is stunted and gets no sunlight. We bought transplants from my favorite nursery and stuck them in a sunny part of the garden. They are doing very, very well and I expect to have some cukes in the next couple weeks.

Friday, June 4, 2010

Sunflower Sun Screen

This weekend the temperatures are supposed to reach 107.
Ugh...this is the worst part of living in the desert.

When I heard the weather forecast earlier this week, I convinced my husband that we should do something to shade the sun from our kitchen window. This window faces west which means it absorbs the afternoon and evening sun. Our solution? Plant Sunflowers!

We planted the seeds in pots on Sunday and look what I found this morning...


I planted three seeds on Sunday. I think I will stagger planting them in week intervals, so this Sunday I will plant three more. We will see how this works. My hope is to temporarily shade the window and collect some seeds in the process.

Sunday, May 30, 2010

Today's Harvest: RED POTATOES


Today I dug my second pot of red potatoes. The heat has been in the high 90's this weekend and the plant just died. I'm holding my head high though.....I have 3 more reds! Between to the two red potato plants, I have enough for a meal. Tomorrow my husband and I will roast some red potatoes as part of dinner.

Saturday, May 29, 2010

Today's Harvest: TOMATOES

I will call this post "The Good, The Bad and The Ugly".

My husband and I are using this long Memorial Day weekend as a Spring cleaning opportunity, even though it feels like Summer.Since we have a tomato thief in the neighborhood (see my Squirrels are Evil post), I made a bee-line to my tomato plants this morning. Sure enough, a bright red half eaten tomato was laying under my plants. I should have taken a picture of it, but I was so mad I hurled it over my wall.

The good news is there were several other red ripe and almost ripe tomatoes on the plants. I picked several Juliet tomatoes and one small Roma.


Ok, now for the bad and ugly. My husband planted San Marzano tomatoes this year. He's a foodie and the San Marzanos are a popular gourmet Italian tomato I guess. There were a few ripening tomatoes on his plant that looked very nice...

...until you looked at the bottoms of them. This is our first experience of blossom end rot. It is such a shame because the rest of the fruit looks healthy and beautiful.

Apparently this can happen if you water your plants inconsistently. We have been watering them every other day for 25 minutes in the early morning. Maybe we need to do 15 minutes everyday? I'm just guessing at this point. All is not lost though, there are several tomatoes on the plant that still look great. We will adjust the watering schedule and see if we can salvage the next harvest.

Sunday, May 23, 2010

Today's Harvest: RED POTATOES

One of my potato plants was looking sick..


While the plant wasn't completely yellow, I couldn't wait to see what was underneath. It was dropping its lower leaves and the upper leaves were turning yellow. I have heard that when the plant turns yellow, you are supposed to dig the roots up. So, being the impatient gardener I am, I grabbed my plant at the base and pulled it out of the pot. To my surprise, I have 4 of the cutest little red potatoes you have ever seen! I am so proud of my babies and I plan on eating them tonight. I can't believe this experiment works.


I think I could have had 4 larger potatoes if I had waited for the whole plant to turn yellow. I will wait for mid to late June to dig my other potatoes up and see if I have more than this plant gave me. In the fall, I am going to plant a large area and see if I can continuously harvest through the winter.

Friday, May 21, 2010

Squirrels are Evil...with a capital E

just a quick rant about a SQUIRREL....

My dear hubby went out to look at the beautiful tomatoes that are growing wild in the garden. On the back wall of our yard he spotted a wee-little thief with a juicy red Juliet tomato in its mouth. It was the first tomato to turn red this season and I was waiting a couple days to pick the bunch that surrounded it. We watched the beast frolic away from us in anticipation of its delicious dinner. I promise you that the little rodent practically skipped away it was so happy!

I feel defeated.

Anyone out there know how to prevent your garden from becoming a buffet for critters?

PS: The crazy squirrel photo is from THIS website where I found an article on "Getting rid of squirrels" by Pam Sissons.

Defeated......

Wednesday, May 5, 2010

Zucchini Are Growing!

In an effort to make up for my lack of posting for the last couple of weeks, I am a blogging fool today.

The zucchini I planted in February are getting very large. Some of the leaves are larger than my hand, which is a big surprise to me. The leaf stems are covered with prickly hairs that hurt when you push them aside to take a picture of the fruit, like I did today.


You can see the zucchini growing at the base of the flower. Its probably 2 1/2 inches long at this point and there are 3 others forming on this plant. I have three plants in the garden and all of them are starting fruit. I am so proud of the plants I started from seed. It gives me such a sense of accomplishment.

Will post more when I harvest...

Book Review: Garden Wisdom & Know-How

My dear hubby gave me an enormous soft cover book for my birthday this year. It is called Garden Wisdom & Know-How by The Editors of Rodale Gardening Books. It is like an encyclopedia for gardening! There are step-by-step instructions for everything from seed starting to building a removable window box. It boasts "7,354 Charts, Lists, Tips, Instructions, Diagrams and Illustrations." I have spent hours reading this book since I received it last week.

While, there isn't a ton of information on gardening in the desert. There is an extensive section on watering techniques, water conservation, and rain water harvesting. And I am SO inspired by the garden plans that are detailed — my favorite is the Dye Garden full of plants that are used for different color dyes.

Every time I pick this book up, I find something new I want to try or build. I love it! My only complaint would be the lack of information on gardening in arid climates and the black & white illustrations. I don't mind black & white for the most part, but it would be nice to see the color of plants, flowers, and insects.

Today's Harvest: LATE CARROTS

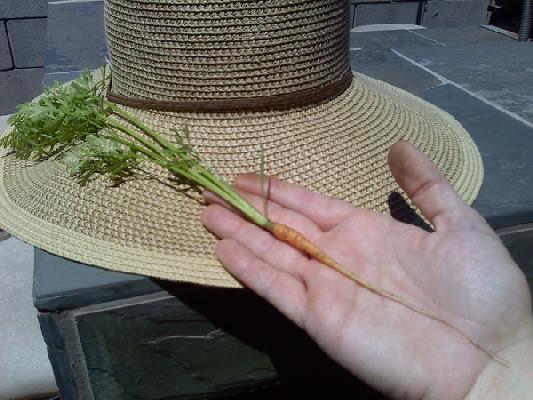
LOOK! A Carrot! :)


I planted this carrot in February. It is the smallest I have ever seen. I'm hoping that they will get a little bigger before the hot weather really gets going. Apparently, root veggies like carrots and radishes are cool weather crops that really hate the heat. I will plant them again in October and see how they grow. By the way, my husband and I shared this little carrot! Hahaha!

Look for a monthly planting guide for the desert coming soon! I am attempting to merge planting guides from local nurseries and will publish a seed planting guide for each month.

Monday, April 12, 2010

Today's Harvest: RADISH & SNAP PEAS

Quickly...the peas are coming and the radishes are ripe for the picking! It is such a great feeling to poke my finger around the base of the radish greens and feel the round red roots. They are, by far, the easiest and fastest food I have grown in my little garden.

Saturday, April 10, 2010

Today's Harvest: RADISH

Aside from my aphid woes, I harvested a single radish today to see how big they are.


They are not quite big enough to harvest, but very tasty so far. I can't wait to add them to my salad. My husband and I sliced it and enjoyed tiny slices of radish at lunch.

More Aphids!

I thought my aphids were fat and green with skinny little sticks for legs. Wretched little creatures that I can't stand to touch. Apparently, they are also winged and resemble gnats. Good grief!

Tonight they must die. Where is my magical aphid spray?

Monday, April 5, 2010

How to Kill Aphids

When I started this perfect little garden of mine, I never though that my plants would have pests. My stomach sank when I saw the greedy little green aphids on my lettuce. I panic every time I see a microscopic orange mite crawling in the dirt. I hunt those tiny fly-like bugs that cling to my tomato leaves and squash them out of fear.

I have never seen so many bugs! I knew that aphids were bad news and I found an easy organic solution, thankfully. But there are so many others and I have read online that some pests are beneficial. Its confusing and I need to know how to handle my garden correctly.

To kill the aphids, I tried this little recipe on my lettuce:

  • 3-5 drops of a mild, fragrance free, liquid dish soap
  • 1/2 teaspoon of cooking oil
  • Fill the rest of a water spray bottle with water. I used a cheap small 12 oz bottle.

Shake it up and spray a stream of the liquid on your plants. It worked like a charm for me. They fell off the leaves and I haven't seen them since. Please understand that I have only used this method for a couple weeks...my methods may not be full proof, but it is working so far.

And the best part is my lettuce still tastes great after a quick rinse.

Thursday, April 1, 2010

How to Plant Potatoes

In early February I decided to experiment with planting potatoes. I had attended a local gardening workshop where the class planted pieces of organic grocery potatoes in a sunken garden. It was cheap and easy enough to do. Why not give it a shot?

How I planted my potatoes:

  1. Purchase one organic red potato (any potato will do) with lots of eye dimples. I should note that some gardeners say you should only plant seed potatoes, but I'll try these store bought red potatoes this year.
  2. Cut the potato into a few pieces, making sure there are at least 2-3 eyes on each piece.
  3. Lay the pieces in a sunny dry spot to scab over — I let them stay out in the sun for 2 days.
  4. Prepare a bed for the potatoes. In the workshop they had dug twice the depth of the shovel head and added compost to the soil. For my purposes, I planted them in large pots using potting soil for veggies because I had already run out of room in my raised garden bed. I placed some small rocks at the bottom of the pots to aid in moisture drainage.
  5. Plant the potato pieces. It doesn't matter if the eyes point up, down, left, or right — just toss them in! I placed one piece in each pot at a depth of about 8 inches. At the workshop garden, we planted them about 12-18 inches apart at a depth of 8-10 inches.
  6. Water thoroughly, place pots in a sunny spot, and wait patiently. The leader at the workshop said I should be able to harvest in June.

I wasn't sure if this would work in my pots but, as you can see below, they finally sprouted after about 4 weeks.

And this is what they look like today....

The only thing I will do differently next time is plant in a bigger pot. These pots were only 16 inch diameter which will probably cramp the development of the potatoes. Next time I will find a much larger pot. I think a plastic storage bin with holes drilled in the bottom would work nicely. I will post more when I harvest.

Exploding Lettuce!

My husband and I tested out the new drip irrigation last week while we escaped to Las Vegas. We set it on a timer and tried to forget about it. My fear was that we would not water the garden enough or the soaker hoses would not be positioned close enough to the roots to keep the plants alive. The temperatures increased from the mid to upper 60's to the mid 80's and I had visions of dead and wilted veggies. Boy was I mistaken!

The most noticeable growth was the lettuce. When we left, it looked like this...


Tiny little plugs of lettuce that looked like it had a long way to go before we could enjoy a fresh salad.

The little puffs of green in the back row are iceburg lettuce which, as you can see, are placed in a shaded row. This stunted their growth a bit in the beginning, but the sun has since shifted and that row is getting full sun.

This is what it looks like today!

Amazing growth in just 7 days. And that is after eating three servings of salad two nights ago! I am so excited. We do have some critters (Aphids?) that have taken up shop on the red oak leaf in the front row, but I am sure the problem can be solved easily. I'll be researching that today.

Sunday, March 7, 2010

Vegetable Inventory

Today I bought more transplants. I shouldn't have added to my collection of plants, but the tomatoes at the local nursery were many weeks ahead of my seedlings and I am an impatient girl. I think I need to take inventory to have a realistic idea of how to handle this garden of mine.

In the garden:
9 Sugar Snap Peas (from seed)
9 Pole Beans (from seed)
6 Spinach (transplant)
6 Iceberg lettuce (transplant)
3 Zucchini (from seed)
1 Basil (transplant)
1 Tomatillo (transplant)
1 Roma Tomato (transplant)
1 San Marzano Tomato (transplant)
1 Champion Tomato (transplant)
1 Yellow Bell Pepper (transplant)
6 Marigold Flowers (transplant)
6 Red Leaf Lettuce (transplant)
4 Red Oak Leaf Lettuce (transplant)
6 Romaine Lettuce (transplant)
In containers:
1 Peppermint (transplant)
1 Best Mint (transplant)
1 Cilantro (transplant)
1 Jalepeno Pepper (transplant)
2 Red Potato (from seed)
1 Russet Potato (from seed)
1 Snap Pea (transplant)
1 Dwarf Myer Lemon Tree
1 Dwarf Orange Tree
Look at that list! And I still have many seedlings inside waiting to be transplanted.

9 Cucumber
6 Zucchini
9 Luffah Gourds
7 Basil
5 Bell Pepper
2 Jelly Bean Tomatoes
11 Cherry Tomatoes
5 Better Boy Tomatoes
4 Roma Tomatoes

I might need another raised garden...or a small farm. :(

How many zucchini will one plant produce?

I don't know if it is too early to start thinking about food preservation, but I am. It is only March, and the garden is in its infancy. The lettuce and spinach I transplanted a couple weeks ago are obviously too small to harvest. The pole beans and snap peas I planted are no where near ready to produce. I have 9 zucchini plants started, 3 are in the garden. Last week my father saw all of my seedlings and, with a hearty laugh, said "Do you know how many zucchini one plant will give you??!!" This was another hint that I may have planted too much. I think I should invest in some canning supplies and learn about freezing, dehydrating, and root cellaring. If I plant all of the seedlings I have sprouted and they produce vegetables, I will be knee deep in tomatoes and zucchini!

I found that the folks at Storey Publishing have many, many books on homesteading and self-sustainable living. I have purchased my first book on food preservation called "The Beginner's Guide to Preserving Food at Home" by Janet Chadwick. I spent today studying the information about the equipment I will need to can, and what to do with all of this zucchini.

Some of my options are:

  1. Eat them fresh.
  2. Slice and freeze on a baking sheet, then bag.
  3. Shred and freeze in usable portions for breads.
  4. Pickle them bread and butter style.

It will be interesting to see how much success I have with this year's garden. I am optimistic. I can't wait to try all of the preserving methods in my book.

Saturday, March 6, 2010

How to Build an Easy Drip Irrigation

In an effort to maintain a consistent watering schedule and conserve water, my husband and I created a fairly simple irrigation system that we can set on a timer. Here is a photo of our system...


What you need to build your own:
  • 1-6 foot garden hose
  • 1-hose end piece that will stop water from coming out the end
  • 2-50 foot soaker small irrigation hose
  • 1-packet of irrigation hose plugs
  • 1-packet of barbed irrigation hose connectors
We also purchased this strange little tool that holds the barbed connectors while you push them into the garden hose. I'm not sure this is necessary. If you talk with people in the plumbing department of your local home improvement store they can help you find what you need.

Here's how we built it:
  1. We laid the garden hose over the end of our raised garden to mark the spacing of each soaker hose that will run the length of the garden. We marked it with a pen.
  2. We used a nail to puncture the garden hose on each pen mark so we could insert the barbed irrigation connectors.
  3. We inserted the barbed irrigation connectors into the garden hose.
  4. We measured out lengths of the irrigation soaker hose and cut it using scissors.
  5. Then we connected the soaker hose to to garden hose by pushing the barbed connectors in the end of the soaker hose.
  6. We then used the irrigation hose plugs to plug up the ends of all the soaker hoses.
  7. We connected one end of the garden hose to a long garden hose that ran to the backyard faucet, and connected the other end to the cap that prevents the water from running out the other end.
  8. We laid it across the width of the garden and placed the soaker hose where we wanted it.
  9. Turned on the water and watch the magic.


In the photo above, you can see the end cap we purchased. Its the bronze color metal at the end of the garden hose. I think there is a smaller version that is not as enormous but we couldn't find it. Also you will notice that we attached the garden hose to the garden bed. This keeps the hoses in place since our garden hose is 6 feet long and our garden is only 4 feet across. I should mention that there are a variety of irrigation kits that you can buy online or at a store. These probably have great instructions and are built to fit together. This might be a good option too.

The next step will be to mulch heavily in preparation for our summer heat. I am told that mulching will keep the moisture from evaporating in the summer.